Week 9: Progress & Revelations
- Jack Ferrari
- Mar 19, 2024
- 3 min read
Updated: Apr 21, 2024
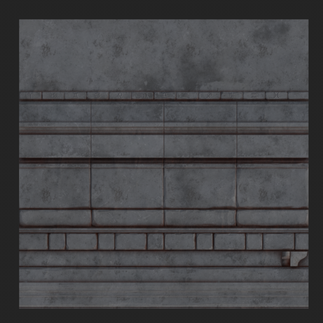
For this week I was determined to figure out trim sheets & their applications to get some more refined textures onto my models, moving them further away from dull grey blocks.
My port of call this time would be a collection of various YouTube videos I had saved over the past couple weeks each covering the subject:
Escape Studios [1]
Polygon Academy [2]
Polygon Academy [3]
ZBrush High-Poly Stone Trim Sheet
Splitting up my model once again into various parts, this time mainly focusing on exclusively stone elements opposed to a selection of materials like previous attempts.
I exported that model into ZBrush which will allow me to add more hand crafted characterful surface elements into each section.
Once in Zbrush I subdivided the sections, achieving and editable level of geometry and auto grouped the individual strips enabling efficient working with masks and soloing of objects.
My next step was to use the TrimSmoothBorder, HPolish and Flatten brushes to add edgewear and surface damage. I feel the result could've been a bit more dramatic and dynamic with many cracks and more variation to help sell the "Stone" look. However I wanted these elements to be a break from the otherwise noisy bricks and can achieve some of these elements using Substance Painter.
Substance Painter followed the same workflows as before but most importantly more occlusion masks were used to push the finer details but also mirror the material that would build up in these cracks in real life.
One such surface detail was the inclusion of the Zodiac Runes on a row of bricks. This was achieved by making a custom Alpha in photoshop (Applying a layer style inner glow helps it seem chiselled into the surface) I found it much easier to do this in Substance opposed to Zbrush for that extra level of accuracy and avoided the need of a ridiculously high poly count that would've been necessary for such fine details in ZBrush.
Textures: Substance Painter texture and custom alphas
Whilst this is a process that would likely be more efficient and backwards changeable in SubstanceDesigner (and its node based structure) my familiarity with ZBrush allowed me to work much faster and overall get a effective result in a fraction of the time.
Trim Sheet Application: Selection of UV layouts and on model textures
The final stage of this process was applying said trim to my models. Creating a lambert material with image as colour in MAYA enabled me to visualise where the textures would sit on the meshes.
This did however make evident the need to re-unwrapping many assets since their UVs were cut to prioritise the square UV space not work outside of it. Being able to visualise the interplay between both elements quickly resolved the confusion I had around this process.
A specific UV that caused me issues was the round window. But asking the technicians in class recommended cutting out each face and manually placing them in a row. Whilst not time efficient it did create a superior result compared to straightening the UV. In turn this also allowed me to use my created rune bricks for an extra level of thematic detail.
KEY INFORMATION From The Week
I created a baked stone trim material using all previously used programs that was then applied to my models.
[1] www.youtube.com. (n.d.). Substance Painter Tutorial: Demystifying Trim Sheets. [online] Available at: https://youtu.be/qEuGyIkvKx4?si=UxoZi5Ol0h-a2NVI [Accessed 17 Mar. 2024].
[2] www.youtube.com. (n.d.). TRIM TEXTURE TUTORIAL - ENVIRONMENT ART 101. [online] Available at: https://youtu.be/IziIY674NAw?si=N8WQIdPSw4Fkxy7b [Accessed 17 Mar. 2024].
[3] www.youtube.com. (n.d.). Sculpting Trim Sheets in ZBrush - Trim Texture Tutorial Part 2. [online] Available at: https://youtu.be/Tspveb9bjYA?si=86H71OOtmC3RmAVT [Accessed 17 Mar. 2024].


Comments