Week 11: Set Dressing & House Keeping
- Jack Ferrari
- Apr 17, 2024
- 4 min read
Updated: May 10, 2024
The SOMETHINGTH STEP:
This week began with me FINALLY sitting down and committing to applying my Trim sheet textures to the entirety of my model. This had been put off for far too long and would enable me to move onto more set dressing and "fun" elements without the looming guilt of having to go back to complete a mountain of unnecessarily unfinished assets.
As per previous assets this involved organising, straightening and laying out my UV's with a set Texel density. This time around it was much faster as my previous struggles and confusions had actually improved my overall understanding of what makes a suitable UV shell for trim.
During this process I made the decision to use my existing metal trim sheet to texture my existing street furnishing assets. I felt this to be a suitable decision for a number of reasons:
Firstly it would save me time thus enabling the creation of a more interesting scene,
Help push a cohesive art style and direction across the scene,
In engine means there are less texture draw calls.
All of these reasons taking inspiration from actual processes within the gaming industry and demonstrates the versatility of Trim.
MAYA: Trim Sheet Textured Assets
With that out of the way I was ready to start the next step and process that had previously eluded me... Foliage!
The overwhelming amount of tutorials and workflows that are possible when it comes to foliage really meant I was unable to see the wood from the trees. With a growing collection of unsuccessful attempts I approached my lecturer William Pryn and Louise Crouch on what approaches they would recommend.
The main processes include:
For the Textures:
Sculpt leaves in Zbrush and place them around tastefully to create the desired plant, PBR render the result which can then be taken into Substance Painter for texture creation.
OR Utilise photos/scans of the desired plants, take them into Substance Sampler and use the Image to Material function.
Once a completed Atlas is made this can be taken into MAYA and applied to a plane.
Eventually deciding the image to material approach would be most fitting of my scene I was
pointed towards a GAR203 mural on the creation of foliage from photos...
The first step of which was to go out and take actual photos... At a bright and early 7:00am (allowing me to go rooting around like some hedgerow dwelling cryptid without being seen by the general student populace) I took off! My plan was to use an A4 sheet of paper placed behind any plants to aid with the cutting out process later on but also meant I didn't have to damage the plant themselves.
I also realised that if I had the 4 corners of my photo frame aligned with the pages corners each photo would have the same scale and thus pixel per plant would be consistent. (real world Texel density)
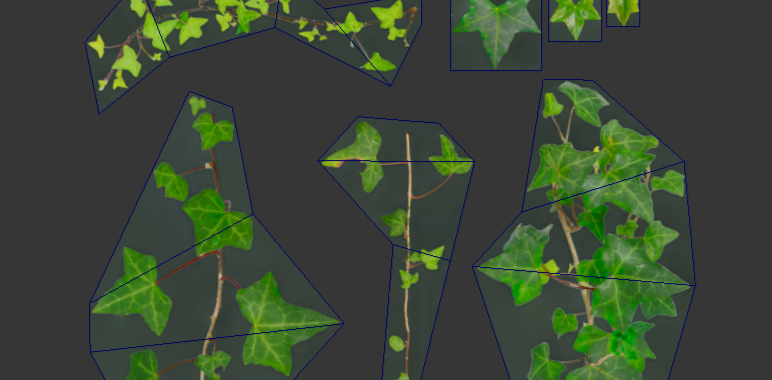
Foliage Workflow: Workflow of my Ivy asset
174 Photos acquired I weeded out many that were not appropriate, and took them into photoshop. My using of the paper meant the image selection tool was almost pixel perfect and quickly allowed me to move onto the next stage.
Once cut out and minor alternations were made to colour grading, making all the plants look more universal (where different light levels affect the pictures there is the potential to make the final foliage look like a patchwork creation) I spaced out my ivy limbs out to create an Atlas.
Following alongside the mural I imported to Sampler, using the image to material function, altering the normal values to help give my leaves the desired bump!
Moving into MAYA and applying the new texture to a plane would allow me to create a low poly shape that would encompass each section of ivy. The next step was to create clusters of the plants to be placed around in my scene. This is where Make Ivy In Blender
Augenblick Tutorials [1] came in handy, seeing how they laid their plants out combined with observing how ivy actually grows that morning. One little touch I added to create depth was a small selection of individual leaf planes protruding from the surface alongside gentle altering's of the main planes, furthering the realism and impact of this asset.
Finally all these meshes were combined, exported out of MAYA and then placed around my scene in Unreal.
One issue I encountered here was the inability to make the background grey colour transparent. To fix this I created a new opacity mask by altering my original Photoshop atlas file to only include black and white which did remove the background colour when applied as a mask.
Unreal Screenshot: In Engine laid out assets
KEY INFORMATION from the week:
Finished texturing up miscellaneous models using existing trim sheets.
Using Substance Sampler's image to material function combined with an Atlas of edited photos taken by myself I created my first foliage to be placed around my scene.
[1] www.youtube.com. (n.d.). Make Ivy In Blender. [online] Available at: https://www.youtube.com/watch?v=D5PgRc47mj4&t=79s [Accessed 18 Apr. 2024].


Comments