Week 10: Hero Assets Signs & Pillars
- Jack Ferrari
- Apr 17, 2024
- 4 min read

Updated: May 9, 2024
The design for my shop sign was started a couple weeks ago now but I wanted to lay out the inspirations here:
The moon is an obvious celestial symbol, clear associative readability having it protruding furthest into the street, theoretically seen first thus make prospective customers know what this business is about and where it is!
The central star over the main sign is meant to be like a guiding star, you've found what you are seeking... Alongside this, the idea that fates and destinies are linked to the stars has existed for centuries, even in todays society with its obsession with horoscopes and star signs, at the end of the day however its a star so another relatively face value link.
Now all good things come in 3s and the circles were no different on my sign. There is an enormous amount of popular 3s in media, religion and culture be it the separation of time into Past Present Future, reality into its 3 Dimensions, the holy trinity or even the Triforce. Since this shop deals with space and the power of divining the past or future I wanted to pay homage to this famous iconography.
"Surely it’s just one number of many and they’re all as good as each other. Well, actually, it’s a really useful creative design tool, which works particularly well with storytelling." [1]
So this reading week I set my sights on the shop sign hero asset. Following a similar workflow to the Highpoly details found on my stone trim sheet I started by importing the base lowpoly mesh into Zbrush. Using the Dynamic Subdivision function in conjunction with ZModeller allowed me to crease the main edges, forcing them to stay sharper (due to the overall low base topology without this the mesh would completely break) then applying said division to create an editable level of geometry.
Using HPolish and a variety of Trim brushes to add further details to the sculpt. A different function I used on the wooden sign section was the addition of a surface noise modifier. This gave me a subtle wood effect that will help pickup details when in Painter and overall add distinction between the 2 main materials.


Zbrush: Low & Highpoly Sign Creation
Once content with the main sign sculpt I moved over to Substance Painter to bake the high to low mesh. After a little trial an error, since I had moved the sign at some point in the Zbrush process and had to further push some of the additional detailed elements as they were too subtle in the bake.

Substance Painter: Textured Sign
Once again referring back to my original branding moodboards I created the materials using the tried and tested layering workflow. The only addition to this process was the shops logo. For this I created a custom alpha of the logo I had previously made, using a paint layer added it on top.
Whilst this could be done with a decal in engine for wider usage on several shops this sign is specific to this shop, meaning there is no need for it to be modular or usable outside of this location
Pillar Topper
Another detailed asset I worked on this week was my Pillar Topper. Taking inspiration from Corinthian Pillars that were seeing a revival during the Victorian period. This not only befitted the time period set for this project but also given that my main iconography/ lore behind my shop involved Centaurs (a traditionally Greek mythological creature) it felt even more appropriate.
This fascination with antiquity was not just a mere replication but a reinterpretation, blending ancient motifs with the technological advancements and sensibilities of the 19th century. [2]
Corinthian is the most ornate and noble of Classical columns, taller and more slender, typically ten times as high as the diameter at the base, and with a rather deep capital, carved with the rather stylised leaf designs known as Acanthus [3]
For this I used many of my previously mentioned methods. But the variation in this process involved using curve deformers on a long rectangular shape, combined with a sphere to achieve the spiralled corner Acanthus/ Scroll.
I only modelled one version of each segment and UV unwrapped them before mirroring around the main base. This means each element will share a UV, optimising the UV space available.


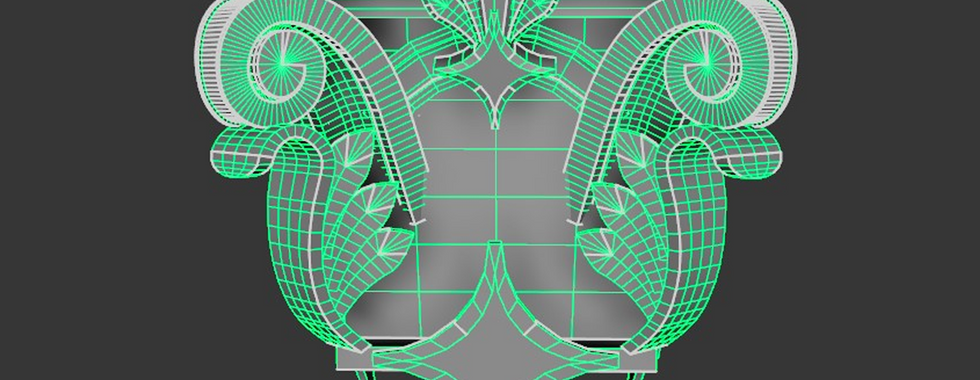


The model initially had an incredibly high poly count due to wanting that clean curve, but was eventually cleaned up and reduced. I could've pushed this even further as many of the details could've been baked on, opposed to sculpted and left, but my original plan was to use my existing Stone Trim sheet to texture this asset so many of the details wouldn't have stood out. As you can see above. (For an even more optimised project this would have been fine)
I eventually decided to texture the asset in Painter, as had the texture budget for it and felt it was an important, high impact enough piece that will get a lot of usage throughout my scene.
KEY INFORMATION from the week:
ZBrush: Created a Highpoly version of my hero asset sign. Sculpted in surface details
SubstancePainter: Using reference created textures for my sign using a custom Alpha for the main logo.
Pillar: Created a detailed Corinthian pillar topper for my scene.
[1] Design, N. (2021). Three. That’s the magic number. [online] Narrative Design. Available at: https://narrativedesign.co.uk/2021/03/22/three-thats-the-magic-number/ [Accessed 19 Apr. 2024].
[2] The Archaeologist. (2023). Victorian Architecture Inspired by Antiquity: Techniques and Styles. [online] Available at: https://www.thearchaeologist.org/blog/victorian-architecture-inspired-by-antiquity-techniques-and-styles. [Accessed 16 Apr. 2024].
[3] www.speel.me.uk. (n.d.). Sculpted Pillars - Bob Speel’s Website. [online] Available at: http://www.speel.me.uk/gp/pillars.htm.[Accessed 16 Apr. 2024].


Comments